


 APPS
APPS
APPS
APPS
APPS
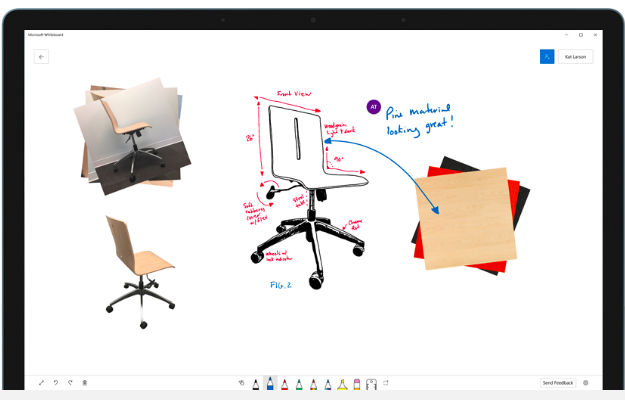
Microsoft Corp. today opened up a public beta of its collaboration Whiteboard app to all users with a Windows 10 device.
Microsoft Whiteboard was introduced earlier this year, when the company launched its new Surface Pro. Until now the collaboration app has been available in a private beta, but Microsoft has now opened it up to all users.
The Whiteboard app provides similar features to the experience available on Microsoft’s expensive Surface Hub. Businesses that don’t have the space or money for the Surface Hub can use the Whiteboard app to collaborate and brainstorm concepts and designs with co-workers across devices.
The Microsoft Whiteboard Preview is rolling out to all Windows 10 devices, set to English, over the next 24 hours. The company plans to roll the app out to additional languages in the “coming months.”
Windows 10 recently passed 600 million monthly active users, the majority of these are on personal computers, but the number also includes Xbox Ones, Windows 10 Mobile phones, HoloLens and Surface Hub. While the Whiteboard app is currently only available for Windows 10 devices, considering the recent rollout of the Microsoft Edge browsing app to Android and iOS, this could change in the future.
To get started, you can download the Whiteboard app from the Microsoft Store on your Windows 10 device. The Whiteboard Preview app will eventually replace the existing Whiteboard app on the Surface Hub, so you can download it and use it alongside the existing one.
Once you have installed the app, you will need to signin with your Microsoft account.
If using a device with an active pen, you can draw on the screen to display the ink and pan in and out using your fingers.
Alternatively, for passive devices, you can use the finger painting mode and use your finger to draw on the display. When the mode is disabled, you can zoom in and out using your fingers.
No matter the device you are using, you will have access to a variety of color pens, highlighters, and erasers, displayed at the bottom of the screen.

The on-screen ruler will allow you to draw straight lines and align objects on your board.
On your whiteboard, tap the Ruler icon at the bottom of the screen. To position the ruler on the screen, use one finger to move it up, down or sideways; two fingers will rotate the ruler to a specific angle; three fingers will rotate the ruler by five-degree increments.
To draw a straight line, select a color pen or highlighter and draw along the ruler’s edge.
You can transform hand-drawn shapes into precise shapes using the Ink to Shape feature. Once enabled, the feature will automatically transform your drawing on the whiteboard into the exact shape. The feature will work with squares, rectangles, triangles, circles, hexagons, pentagons, and parallelograms.
Tip: To revert back to your original ink shape drawing, simple tap the Undo button.
You can enable or disable the Ink to Shape feature in Settings.
To draw a table on your whiteboard, simply draw a square and wait for the Whiteboard app to recognize it. You can then bisect the square with horizontal and vertical lines.
Use the “+” or “-” symbols to add or remove columns and rows. You can also use the highlighter tool to highlight specific cells in the table.
To delete content in the table simply use the eraser tool. It will first erase the content before erasing the entire table.
To add images to your whiteboard, simply copy them from an app or browser and paste it onto your whiteboard. Alternatively, to insert an image from your device, right-click or press and hold > select the Image button > select your images from the File Explorer.
Once you have added pictures to your whiteboard, you can stack them on top of each other. Move a picture over another one until the Stack button appears > hover over the Stack button while moving the object to create a stack.
To add a sticky note, open the context menu and select Notes. You can write on the sticky notes and stack them like pictures.
To allow for collaboration on the Whiteboard app, at least one participant needs to have an active Office 365 subscription. While signed in, you can start a collaboration session by tapping the Invite button (displayed next to your name) > copy the link and paste it into a messaging app or email to share it with team members.
Note: The collaboration feature is currently only available for people within the same organization. Microsoft plans to offer the option to collaborate with people outside an organisation in the coming months.
Click the Bird’s Eye View (lower left-hand corner) to see your full whiteboard and any other team members currently working on it. To access your other whiteboards, simply sign in and then click the back arrow (upper left-hand corner) to see all your existing whiteboards.
Source: Office Support
Support our mission to keep content open and free by engaging with theCUBE community. Join theCUBE’s Alumni Trust Network, where technology leaders connect, share intelligence and create opportunities.
Founded by tech visionaries John Furrier and Dave Vellante, SiliconANGLE Media has built a dynamic ecosystem of industry-leading digital media brands that reach 15+ million elite tech professionals. Our new proprietary theCUBE AI Video Cloud is breaking ground in audience interaction, leveraging theCUBEai.com neural network to help technology companies make data-driven decisions and stay at the forefront of industry conversations.