


![]() Trezor is a bitcoin hardware wallet produced by SatoshiLabs. It is a physical product designed to protect bitcoin private keys so that they are not stored on a potentially vulnerable computer and to provide access controls so that only the authorized user can effect transactions from the protected bitcoin wallet.
Trezor is a bitcoin hardware wallet produced by SatoshiLabs. It is a physical product designed to protect bitcoin private keys so that they are not stored on a potentially vulnerable computer and to provide access controls so that only the authorized user can effect transactions from the protected bitcoin wallet.
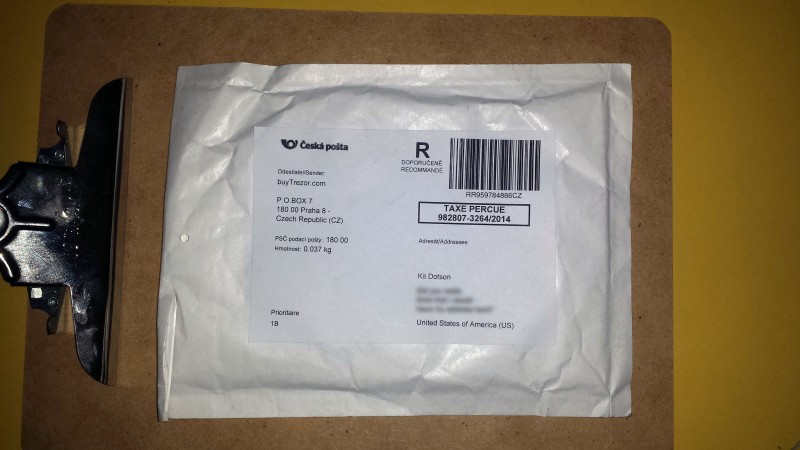
It took two weeks for the product to finally ship, but noting where the package is from it makes sense it took so long to reach me in the United States.
I unboxed the Trezor, took some lovely photographs, initialized a wallet, sent it bitcoins, and sent them back out of it. See below for my review of the product and how I feel about its ease of use and security.
As a hardware wallet, the Trezor stores the private keys used to sign bitcoin transactions. As such it does a fairly good job and has some interesting security features designed to stop easy practical tampering and it does not share the keys with the platform it is connected to. All transaction signing happens on the device itself and it processes inputs and outputs as well as requires intervention from the user (via the buttons) before the device completes transactions.
The Trezor arrived in an inconspicuous — if a little bit beat up — package from the U.S. Postal Service. The from address is in the Czech Republic, making this the first parcel I have ever received from there in my entire life.
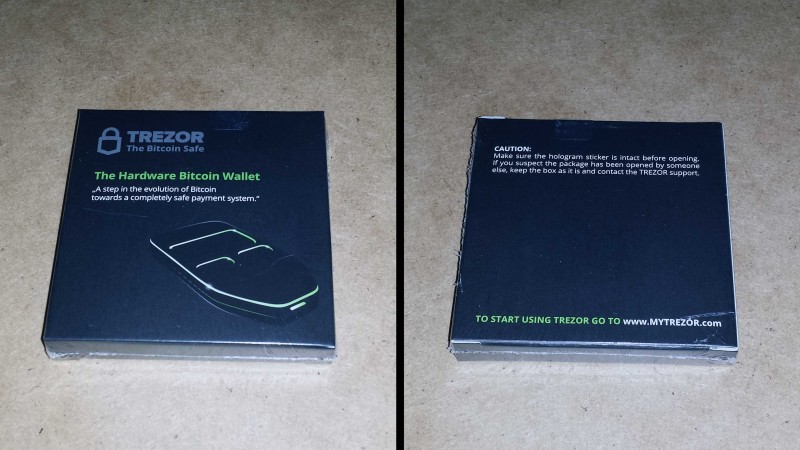
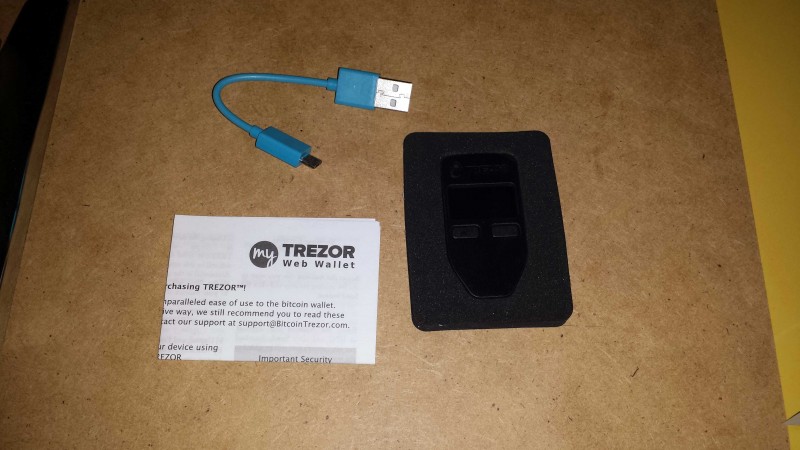
The packaging is shrink-wrapped and has a tamper-resistant sticker on the side of the box that I did have to cut through in order to open and pull out the device and the contents. Inside, I found a set of instructions on a piece of paper, a blue USB cable, and the Trezor set into molded padding. Outside of the box (seen in the photos) I also received a longer black USB cable, see below.
The device itself is small and extremely light. It is made out of a smooth plastic material. The device itself seems to have no tamper-proof sticker or other indications that would let me know if it had been opened after shipping. The device also arrived with two USB cables, a blue one and a black one; the black cable came with a note asking me to use it first if I was “experiencing an issue with my TREZOR device.”
At first glance, the Trezor looks like an oddly shaped clicker for a car. It has a small screen—which I would discover lights up—and two small buttons for interaction. The bottom of the Trezor tapers to a point where there is a micro-USB slot for connecting it to a PC.
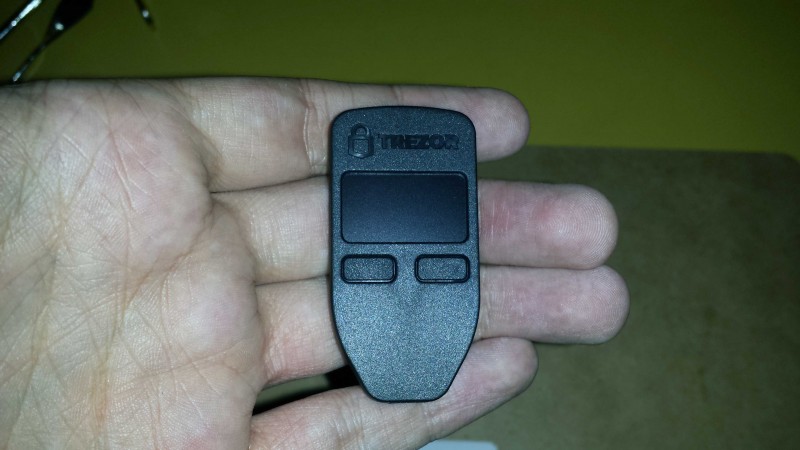
The screen on the device is luminous and has a fairly good resolution for how small it is. I chose a black Trezor so the illumination from the screen really stands out. I also discovered that the short USB cables get in the way more than they’re useful. You may want to buy a longer micro-USB cable to make it easier to interact with the buttons when it requires input.

Getting the Trezor set up became an interesting experience but once my own technical difficulties were swept aside, I was able to quickly get it done.
First caveat, absent a standalone app, Trezor’s use the website MyTrezor.com and a browser plugin to load and interact with the device. I’ve noticed that when plugging the Trezor in, the website doesn’t always notice that the device is attached. It can take a few unplugs and re-plugs and refreshes of the website before it notices. However, once that dance is out of the way, the device works extremely well.
To get started, I had to download the Trezor plugin, which is compatible with the most recent versions of Firefox and Chrome, both browsers that I use on a regular basis. The MyTrezor.com website, which is accessed via SSL and https://mytrezor.com runs the code necessary to trigger the Trezor wallet plugin. Users who want an experience that’s more secure may want to look into a bitcoin wallet that supports the TREZOR instead (see wallet testing section of this review below for more information.)
My problems with the Trezor arose in that I run a lot of script-blocking software on my web browsers. This constantly conflicted with the MyTrezor.com approach and caused a lot of pain when attempting to get the device running and set up. I needed to deactivate the script blockers entirely in order to prevent them from interfering with the website.
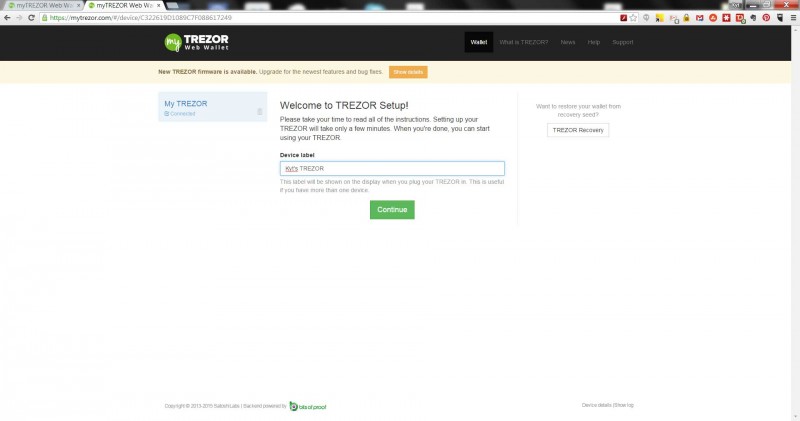
To begin, I named my device: “Kyt’s TREZOR”. These words appear on the Trezor’s screen beneath a glowing lock symbol when the device is plugged in. Useful if I had more than one Trezor and wanted to be sure which one I was looking at.
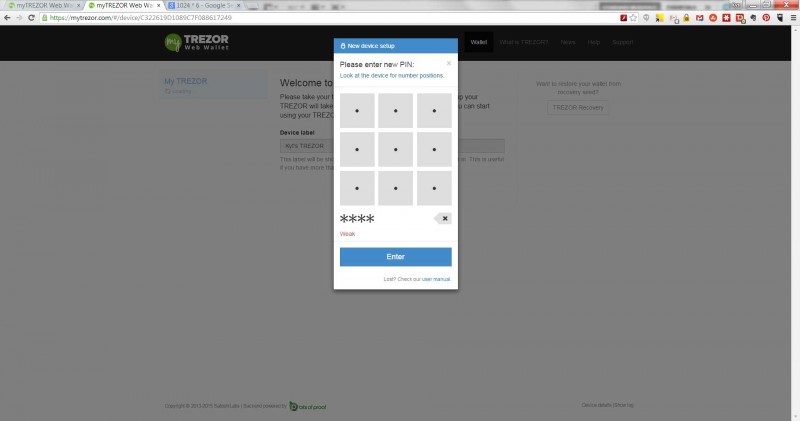
First, I had to initialize the device and set up my PIN. The interesting thing that Trezor does is that a 3×3 set of tiles is displayed on the Trezor device’s glowing screen with the numbers 1-9 randomly placed. The PC screen displays another 3×3 grid and asks me to press the tile-matching the one on the Trezor screen to enter the PIN. The PIN can be up to 10 numbers and the longer the better.
This will come up later when signing transactions using the private keys stored on the Trezor. It’s an interesting take on security that makes it difficult to brute force the PIN because the 3×3 random tiles change each time the device is accessed.
Once a wallet was prepared, the Trezor then took me through the long, tedious (but absolutely necessary) process of setting up the recovery seed. This consists of 24 words displayed sequentially on the Trezor device (and not on the PC) that must be copied down and verified. Once copied, the device took me through them again to verify them. Each time the device required that I press a button to acknowledge.
If I were to lose or have my Trezor destroyed, this would act as my backup seed to rebuild the address database and give me access to the private keys stored on the device. As a result, I simply saved the 24 words in a plain text file within an encrypted volume on my computer for safekeeping.
The MyTrezor.com web page produces addresses on demand to receive bitcoins. It displays the addresses one at a time (more can be requested) as well as a QR code. The QR code follows the current selected on the page and the selection consists of the entire address, which makes it easy to use the “copy” function without worrying about missing any element of the address.
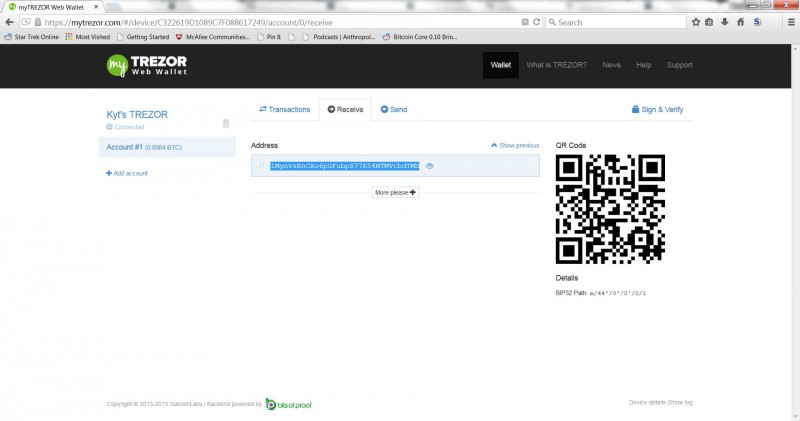
To test this, I sent some bitcoins from my Coinbase wallet to the Trezor address produced. The transaction went just as smoothly as every other bitcoin transfer I have ever run.
With the Trezor plugged in, sending is easy: click on the “Send” tab, enter an address, and enter an amount.
The sending page calculates the fee and lists the inputs address and outputs.
To sign and broadcast the bitcoin transaction, the MyTrezor web page popped up the 3×3 PIN dialogue– with the randomized numbers displayed on the Trezor itself. I entered my PIN according to the randomized tiles and that set the device in motion.
To finalize, the device required that I confirm twice. First, it asked me to confirm the bitcoin address I intended to send to by displaying it on the PC screen and displaying the same address on the Trezor. The first button became “CANCEL” the second “CONFIRM”. The second time it asked me to confirm the amount.
After that, the transaction popped up on the MyTrezor wallet interface and showed that I’d sent my bitcoins.
I needed only wait a mere few seconds for me to see the transaction appear on my Coinbase wallet account, and a few minutes for it to go from pending to confirmed as the Bitcoin network crunched the transaction.
The MyTrezor.com wallet site also permits using the private keys stored on the Trezor to be used to sign messages and to verify messages signed by others. The signature and verification use a bitcoin address in order to sign or verify said messages.
This is accessible via the MyTrezor.com wallet via the “Sign & Verify” tab (on the far right.) In both cases of signing and verification, the beginning of the message text is displayed on the Trezor device for the user to confirm. Conceivably if the message displayed on the Trezor differs from the one input into the form on the wallet site this would be a sign that something went wrong.
First, if the Trezor is lost or stolen, the user needs only use the recovery seed (mentioned earlier in the article) to restore access to the private keys in the wallet and move the bitcoins. Any user keeping track of their Trezor who discovers it lost or stolen in a short period of time would likely be able to recover their coins without much fuss.
But how secure is the Trezor if it falls into the hands of a determined attacker?
While SatoshiLabs claims strong security, it was recently discovered that Trezor’s are susceptible to certain attacks that allow for private key discovery via side channels. Blogger and cryptographer Johoe, best known for intercepting bitcoins during a Blockchain.info security exploit and returning the funds, posted an example of this attack and assisted SatohiLabs in firmware update 1.3.3 that helps mitigate many of these problems. However, as noted in the Reddit thread on the topic, there may still be some potential holes that need to be plugged.
If your Trezor is running on firmware earlier than 1.3.3, it is highly recommended that you upgrade. This update adds PIN protection when generating the public key which helps mitigate some of the side-channel attack vulnerabilities.
Hardware device security is a little hard to test and I don’t have the equipment or software to attempt brute-force or other tricks like above, however, a look at the FAQ regarding Trezor’s security gives a quick idea of what users can expect the security on the device should be.
According to SatoshiLabs, brute-forcing the PIN could take a very long time as even a 4-digit pin would have 6541 possible permutations—this would only increase in complexity for the maximum of 10-digits. The Trezor also places a hard wait on each entry with a wait time increase of a power of 2 each time a failed entry is made.
Even power-cycling the Trezor will not shorten the wait time as the Trezor itself stores the number of failed attempts in its memory.
Also according to SatoshiLabs, attempting to change the firmware will result in the Trezor displaying a warning.
Finally, advanced users into security can verify SatoshiLab’s firmware is good. The security FAQ itself includes a section holding out hope that a few advanced users will in fact regularly verify that the Trezor firmware has not been tampered with, adding an extra layer of consumer security to the device.
The Trezor hardware wallet works with a few software Bitcoin wallets, and I got a chance to test it with one of them: MultiBit HD. This review will be updated with additional wallets as they become available or when they can be loaded up.
MultiBit HD
Testing the Trezor with MultiBit HD turned out to be extremely easy. After using the Windows installer, launching and setting up a local wallet, the rest came fairly organically. First I found “Trezor” under the Tools menu, and I was able to use “Verify Trezor” after a few attempts to get my machine to recognize that the Trezor was connected, MultiBit noticed the Trezor and asked if I wanted to add it.
Then it started with “Requesting Trezor unlock,” which did not go as planned. It took a few more tries (mostly plugging and unplugging) for the unlock to succeed, and it used the same PIN sequence as the setup did with the randomized pad displayed on the Trezor. After entering my PIN, the Trezor itself required a physical button press to acknowledge.
Then I just needed to wait for synchronization. This took four to five minutes maximum.
MultiBit HD’s UI changed slightly to show that I was using my Trezor now including adding “Kyt’s TREZOR” to the program’s name in the taskbar. And, mousing over the shield icon at the bottom, it reads “Using Trezor device to manage private keys for greater security.”
After the synchronization finished, I could view my test payment in the wallet. And the actions to send/receive via the Trezor wallet became active. MultiBit otherwise acts like any other wallet.
Just to see what would happen, I yanked the Trezor off the USB while MultiBit was running and it did not seem to notice it was disconnected. To its credit, however, in order to send any bitcoins it did need to confirm with the Trezor (which is a physical button press on the dongle) so the wallet confirmation dialogue could not send without the device connected.
Electrum
Installing Electrum on my system did not go very well and I was unable to test Electrum integration at this time.
Armory
My software wallet of choice in Windows is Armory. Unfortunately, Armory does not currently support Trezor; however, the FAQ does imply that this functionality is being worked on but no release date is given.
SatoshiLab’s Trezor is one of the first hardware wallets to hit the market. It claims a great deal of security and has a proven sense of ease of use. The wallet looks good out-of-the-box, the instructions are not difficult to understand, and although there’s certainly some friction when it comes to individual users, it still managed to be a smooth install for me.
As with any hardware and software combination, there will be security issues, and SatoshiLabs makes a good show of attempting to stay on top of it. The revelation of the side-channel attack on Reddit and the apparent lack of PIN protection at launch, have both been patched with firmware updates. New security issues will appear and SatoshiLabs’ strong support will be needed to stay ahead of it.
The lack of support for common wallets, especially Armory, is a bit of a downer when it comes to the Trezor, but there are not very many software wallets in the wild yet so MultiBit HD and Electrum feels like a good start. The promise of adding Armory could be a selling point for fans of that client.
Overall, the Trezor is a solid product, with functional software, it stores the private keys inside itself and does signing on-device with user interaction enforced between the Trezor and the machine running the client. Since the keys are never exposed to the world this reduces the chances that a hacker who gains access to a computer (or phone) can steal bitcoins, which is a major selling point, and at $119 it feels like a good price point for an early adopter.
Support our mission to keep content open and free by engaging with theCUBE community. Join theCUBE’s Alumni Trust Network, where technology leaders connect, share intelligence and create opportunities.
Founded by tech visionaries John Furrier and Dave Vellante, SiliconANGLE Media has built a dynamic ecosystem of industry-leading digital media brands that reach 15+ million elite tech professionals. Our new proprietary theCUBE AI Video Cloud is breaking ground in audience interaction, leveraging theCUBEai.com neural network to help technology companies make data-driven decisions and stay at the forefront of industry conversations.